
While searching for a pancake recipe, I happen to stumble across this scrumptious recipe. I love breakfast! I mean REALLY love it. I dream of eggs and bacon, pancakes and sausage...yum! I wish there was a magical egg substitute that tasted just like a real fried egg. I miss eggs...yet, I am determined to make foods taste good and not just 'gluten, dairy, egg, corn free' I want it to be good by its own merit. Really a food to savor. That is what lead me to this quest for yummy pancakes.
I found a great recipe and reinvented it to make it allergy free for me and the kiddos. The result was not only a super easy recipe, but a very good one at that.
Gluten Free Blender Pancakes
1 1/2 Cup Dairy Free Milk Replacement (I used 1 1/3 C. water, 1/8 C. oil and 2 tsp sugar)
1 Tbs Sugar
2 Tbs Oil
2/3 C. Rice Flour
1/3 C. Tapioca Flour
1 tsp. Guar gum
1 tsp Baking Powder
1/4 tsp Salt
1 tsp Pure Vanilla Extract
1-2 Tbs water, to thin batter if needed
Put milk substitute in blender and add remaining ingredients. Blend until smooth. Scrape down side of blender in case some flour has stuck. Blend again.
Heat a griddle to 375 degrees or a non-stick pan over medium heat. Do NOT grease the pan. Pour silver dollar size pancakes and flip when bubbly all over and edges are firm. Cook another minute and then remove from pan.
Top with Earth Balance butter substitute and your choice of maple syrup, jam, or whatever you love!
This can also be made ahead of time or the night before. Just blend again before pouring. Add 1-2 tbs water if needed to thin.
Picture coming soon. I would have had one, but they were so good, we ate them all before I realized we didn't get them pictured.
Sunday, January 22, 2012
Saturday, January 14, 2012
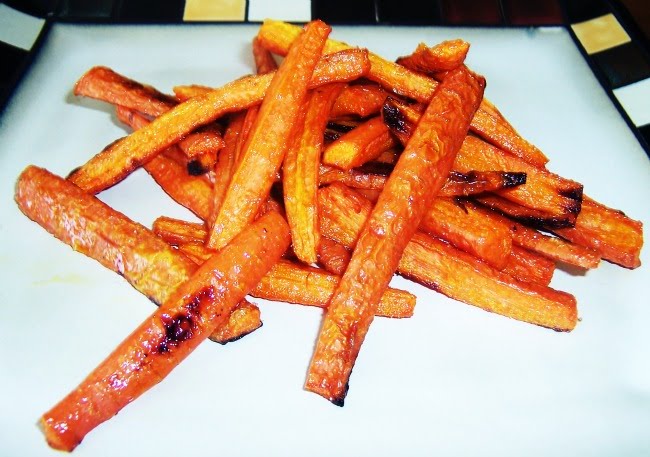
Roasted Carrot Fries
I have had to cut out quite a lot of food lately while trying to figure out exactly what all my baby girl is allergic to. My normal go-to snacks have been moved into the off-limits category and I am finding myself staring into my pantry at all the food I can't eat with a bit of depression setting in. I would love to just reach my little hand in there, grab a bag of my favorite chips and eat the whole bag and I do mean the WHOLE bag. OK, I probably wouldn't eat that much, but just thinking about them makes me want to!
Yesterday we had roast chicken with carrots and baked potatoes. It was completely satisfying and extremely DELISH! Simply, whole food. Yum. I loved the carrots so much, that I just had to turn them into a snack today! They turned out so great that I HAD to share the recipe with you! Super easy, healthy and scrumptious to boot!
Roasted Carrot Fries
4-6 carrots (I used organic)
1 T. Olive Oil or Spray Olive Oil
Salt to taste
Preheat oven to 425 degrees.
 Remove the ends of your carrots and discard or save for compost. Cut your carrots in half then half the narrow part and quarter the thicker part.
When you are done cutting them, toss them into a small bowl and drizzle with olive oil (you can spray if you prefer). Lay them out in a single layer on a parchment paper lined baking sheet (this is not necessary but does make clean up a lot easier and the carrots won't stick.)
Place in preheated oven and bake for 20-25 minutes. Check often after 20 minutes to make sure they don't burn. You want some light browning as the sugars in the carrots crystallize and get the outsides perfectly crispy, but you don't want them to burn.
Remove from the oven toss with a spatula and let sit for a few minutes if you can make yourself wait. Enjoy! 
If you aren't allergic to dairy, ranch would be a great dipping sauce. They are amazing on their own too!

If you aren't allergic to dairy, ranch would be a great dipping sauce. They are amazing on their own too!
Cinnamon Apple Chips

I had bought the bags of apple chips before, which I loved and thought making them without a dehydrator was not possible, but I was WRONG! These healthy rings of goodness can be yours by simply using your very own trusty oven! Yeah! I did a few happy boogie shakes (you know the ones) and set off to get some apples.
My local health food store not only had delish looking apples, but to my delight, they had them on sale for only 2.95 a bag!! SERIOUSLY! this was my lucky day. I grabbed the last two bags and off I went to start slicing and baking.
My first batch I stuck in an waited....burning smell one hour later and I had ruined my whole first pan...ugh! You can picture my disappointment. I was not deterred however, I lowered my temp, lined my pans with parchment paper since the last batch had also stuck badly and shoved them back in the oven, this time checking ever 20 minutes to avoid the last disaster. To my sheer joy, they turned out beautifully crisp and golden!
Cinnamon Apple Chips
Preheat oven to 180-200 degrees.
Thinly slice apples crosswise about 1/8-inch (2 mm) thick with an apple slicer corer or sharp knife. Place apple slices in a small bowl and drizzle oil over them. Toss to coat. Arrange apple slices in a single layer on two parchment-lined rimmed baking sheets, and spray with canola oil cooking spray if you prefer that to tossing.
If using sugar, combine in a small bowl with cinnamon. Put mixture into a sieve and sprinkle evenly over apple slices. You can use your fingers if you want.
Bake in the top and bottom third of the oven until apples are dry and crisp, about 2 hours (mine took a little longer than that to get crisp). Check them every 20-30 minutes and flip after 1 hour. Remove from oven and let ‘chips’ cool completely before transferring to a sealed container for up to 3 days. Makes about 2-3 cups of apple chips.
Recipe Adapted Slightly from Ontario Apple Growers, via Vittles and Bits
- 2-4 large apples, cored (I used Red Delicious)
- 2 T. sugar (optional)
- 1 t. cinnamon
- canola oil or spray
Preheat oven to 180-200 degrees.
Thinly slice apples crosswise about 1/8-inch (2 mm) thick with an apple slicer corer or sharp knife. Place apple slices in a small bowl and drizzle oil over them. Toss to coat. Arrange apple slices in a single layer on two parchment-lined rimmed baking sheets, and spray with canola oil cooking spray if you prefer that to tossing.
If using sugar, combine in a small bowl with cinnamon. Put mixture into a sieve and sprinkle evenly over apple slices. You can use your fingers if you want.
Bake in the top and bottom third of the oven until apples are dry and crisp, about 2 hours (mine took a little longer than that to get crisp). Check them every 20-30 minutes and flip after 1 hour. Remove from oven and let ‘chips’ cool completely before transferring to a sealed container for up to 3 days. Makes about 2-3 cups of apple chips.
Recipe Adapted Slightly from Ontario Apple Growers, via Vittles and Bits
Vegan Gluten Free Chocolate Chip Cookies

I was looking for the perfect chocolate chip recipe that my whole family could enjoy. I have tried lots of recipes, most of which had tasted pretty good for being Gluten, dairy and egg free, but I wanted one that just tasted GOOD because it was actually a delicious cookie.
My husband, who is very skeptical of my allergy free creations is always my best taste tester. I know if he likes it, it is a pretty yummy recipe. He and my 10 year old daughter took the challenge and tried these beautifully, light golden goodies. Both approved and so here is the recipe for you to try for yourself. They would be great to take to a get-together or party. They probably won't know the difference!

Vegan Gluten Free Chocolate Chip Cookies
Adapted recipe from Post Punk Kitchen
1/2 C. brown sugar
1/4 C. white sugar
2/3 C. canola oil
1/4 C. unsweetened coconut milk (or your favorite non-dairy milk)
1 T. tapioca flour
2 t. pure vanilla extract
1 1/2 C. all purpose gluten free flour mix (See my recipe below)
1/2 t. baking soda
1/2 t. salt
3/4 C. vegan chocolate chips or Enjoy Life mini chocolate chips
**Make your own gluten free flour mix by mixing together 4 cups white rice flour (the finer the grind, the better), 1 1/3 cup potato starch and 2/3 cup tapioca starch.
Preheat oven to 350 degrees. Lightly grease two large light metal baking sheets.
Mix together sugars, oil, milk and tapioca flour in bowl of a mixer fitted with paddle attachment. Mix on medium for about 4 minutes, until mixture resembles smooth caramel. (It's important that you don’t get lazy about that step - mix for the full time.) Stir in the vanilla.
Add 1 cup of the flour, the baking soda, and salt, and mix until well incorporated. Mix in the rest of the flour. Fold in the chocolate chips. If dough is stiff, use your hands to work them in.
For three-inch cookies, roll the dough into about ping pong ball size balls. Flatten them out in your hands to about 2 1/2 inches. They will spread just a bit. Place on a baking sheet and bake for about 8 minutes – no more than 9 – until they are just a little browned around the edges. Let cool on the baking sheet for about 5 minutes then transfer to a cooling rack.
For 24 two-inch cookies, roll dough into walnut sized balls and flatten to about 1 1/2 inches and bake for only six minutes.
You can also use a cookie scoop to place on sheet, then flatten slightly with your fingers. If the dough starts to separate & get oily, beat in a little more flour until consistency improves. Also, if the dough is too sticky when you first finish mixing, you can add a little more flour, mixing after each addition, until consistency gets stiffer.
Makes two dozen two inch cookies or about 16 three inch cookies.
Enjoy!
My Journey

I have four fantastic children. My oldest daughter is severely allergic to tree nuts and thus began our journey of eating 'safe' allergen friendly foods. Avoiding nuts was work, but I would soon learn that avoiding different allergens could be even more challenging. Then came my second daughter. So far she is free of food allergies that we know of.
The birth of my son challenged me further. He was covered in a blotchy, red rash all over his tiny body. At first I thought it was newborn sensitive skin, but as the months passed and his skin didn't improve I could no longer believe that. His stools were also very loose, but I was breastfeeding so that didn't really raise a flag for me. Something in my gut just told me to look up cows milk allergy for the possible cause. His symptoms matched and the detective work began. We found he was also allergic to gluten, eggs, peanuts, bananas and fish by doing an elimination diet.


I thought I had it all figured out and then entered baby number 4. She came quickly and with her blazin' rash intact ready to be investigated. I have had to learn how to cook things all over again, as now we must remove soy, coconut and sunflower, much of what I had used to replace the other things I had eliminated.
So....what to do now? What was I going to eat? I bought lots of expensive ingredients, tried many recipes that sounded good, but tasted awful and wasted a lot of money on food that was inedible. I was blessed to meet another mom who had been through this before me and was a huge wealth of information and support. I am so grateful for her help and that is why I want to help anyone struggling like I once was, be it mother trying to feed her body well while helping her allergic infant, single adult trying to eat delicious food with friends or grandmother looking for recipes that her grandchildren can enjoy safely.
I hope this blog is a blessing to you and that you can truly feel free to enjoy the flavor of food even on a restricted diet! Allergen free food doesn't have to taste less than, it can be delicious! I have reinvented my families favorite recipes for you to enjoy! If there is still an ingredient that you cannot tolerate, substitute with what you can use or send me an email and I will try and help you get it just right for you.
Subscribe to:
Posts (Atom)

